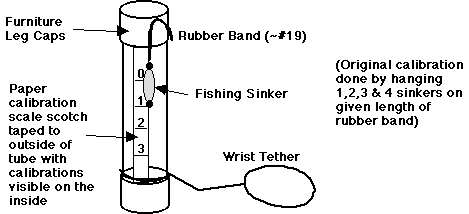
A vertical accelerometer may be constructed by obtaining plastic tubing from a plastics store. In the Bay Area, TAP Plastic is a chain with several locations. For 1" o.d. tubing, TAP had caps available. For 3/4" o.d. tubing, TAP did not have caps (all this may vary from store to store, and from time to time), but furniture leg caps from a hardware store work perhaps even a little better, since the fit is just a little tighter. Choose tubing size and fishing sinker to suit your own needs.One type of fishing sinker has a rubber insert running lengthwise through it in a groove, to hold the fishing line by friction when it is twisted around the rubber insert. It is very easy to attach the rubber band in the same way you would the fishing line. This is not only easier than tying the rubber band to a sinker, but it eliminates having a knot that may come undone during use.
Cut the rubber band, and attach the sinker to one end. Hold the rubber band at the top of the tube so that the sinker hangs about a third of the way down the tube (assuming you are using a one ounce sinker and a #19 rubber band in a 12" tube). Make a mark on the tube at the bottom of the sinker. This is the sinker's position under a one g force (its own weight). To make marks that show the sinker's position under two g's, three g's and four g's, you need to know how far the rubber band would stretch if the sinker weighed twice as much, three times as much and four times as much. Tape a second sinker alongside the first sinker and hold the rubber band in the same spot, letting the pair of sinkers dangle outside the tube. Mark the position of the bottom of the original sinker on the tube. This will be the position under two g's. Do the same with the third sinker, and then the fourth sinker, marking the positions under three g's and four g's. Things may get a little awkward, but no one promised that physics would be easy! After you've made the marks, transfer them to a strip of paper, and then tape the paper to the outside rear of the tube, with the calibration marks facing inward. In this way, the marks can be read through the tube, with the sinker in the tube in front of them. Take off all but the original sinker, and assemble the accelerometer as shown in the drawing above. The sinker will be inside the tube, with its bottom just at the one g mark. The rubber band will drape over the top edge of the tube and will be held in place by the fit of the furniture cap.