CAPACITOR CHARGE/DISCHARGE 2 - LQ
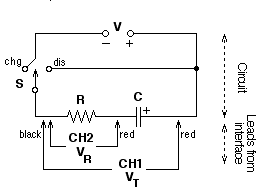
PURPOSE
The purpose of this lab is to examine the pattern of voltage vs. time and current vs. time for charging and discharging capacitors. In the process, you will examine the mathematical equation that describes the data.

CIRCUIT

MATERIALS
50-mF Capacitor, 47-KW Resistor, 1.5-volt cell, SPDT Switch, Wires, 2 Voltage Probes, Vernier LabQuest, LabQuest App., extra capacitors and resistors
  •  PROCEDURE
    1. Set up the circuit as shown above using a 50-mF capacitor and 47-KW resistor. Pay attention to the polarity of the voltage source and the capacitor. The switch (S) can be a mechanical switch or simply a place where you can complete the circuit by connecting wires. (This can easily be set up on a breadboard. See diagram below.)
    2. Connect the two Voltage Probes to Channel 1 (CH1) and Channel 2 (CH2) on the LabQuest. Then connect the probes to the circuit, being careful to have the two black leads connected to the same point. Connect the interface to the computer and launch Logger Pro. Tap on the Data Collection box on the right-hand side of the Sensor screen. Set the data collection as follows:
      Mode: Time Based Length: 15 seconds Rate: 20 samples/second

      CHARGING:

    3. Before charging the capacitor, move the switch to the position labeled "dis". Monitor the voltage on CH1, and when it reaches 0.0, you may begin this portion of the data collection. [To hurry the discharge along, touch the two ends of a piece of wire to the terminals of the capacitor and tap the sensor space on the Setup screen. Choose Zero from the menu.]
    4.  
    5. Press the Collect button on the front or tap the Collect icon to start data collection. At the same time, move the switch to the "chg" position. At the end of the 15-second data collection period, you should have one graph line that remains constant at approximately 1.5 volts while the second graph line moves from a high value to a low one.
    6. Tap on the Data Table icon to move to the table. Tap on the space at the top of the CH1 Potential column. Use the keyboard to enter "Total" recognizing this column as the total voltage. Do likewise at the top of the CH2 Potential column, entering "Resistor" to recognize this column as the voltage across the resistor.
    7. A calculation needs to be made to determine the voltage on the capacitor (VC). You need to subtract the voltage on the resistor (VR = CH2 = "Resistor") from the total voltage (VT = CH1 = "Total").
      • Go to the Data Table screen. Under Data choose New Calculated Column. Name it "Capacitor" with units "V".
      • For Select Equation, use the drop-down menu to choose "X-Y".
      • In the space labeled Column for X: select "Total". (You may need to use the scroll bar on the right to get to this and the next step.)
      • In the space labeled Column for Y: select "Resistor". Click on [OK] when finished.
    8. We will not do a calculation for current, but if you were to do so, you would repeat step 5. This time choose "X/A" and insert the resistor value for A value.
    9. Tap the file cabinet icon to store this run as Run 1. This also sets the LabQuest up to collect a fresh data set.

      DISCHARGING:

    10. With the capacitor fully charged, press the Collect button or the Collect icon to start data collection. At the same time, move the switch to the "dis" position. You will notice that the LabQuest will calculate the capacitor voltage for you this second run, a major convenience.
    11. Go to the ANALYSIS section.
    12. Try other resistor-capacitor combinations as time permits, obtaining the new components from the instructor. See the Extensions.

    ANALYSIS

    1. Tap the box labeled Run 2 then tap on "Run 1". This was your charging graph.
    2. Describe the shape and meaning of each of your graph lines. What does CH2 Potential measure, essentially?
    3. Does the Capacitor Volts graph increase at a steady rate? How would you characterize the rate at which it increases? Compare this characterization with the shape of the CH2 Potential line.
    4. Tap the y-axis label on the graph and choose CH2 Potential from the menu. Select a section where the graph is curving smoothly by tapping and dragging over it. Complete a curve fit operation using a "Natural Exponent" regression under Analyze.
    5. The software evaluates the data for an equation of the form y = A e-Ct + B. Record the value C for the exponent.
    6. Calculate the product of the resistance R and the capacitance C. Then take the inverse product of this value, (RC)-1.
    7. The mathematical equation that describes the voltage on a discharging capacitor is. Note that the constant C that we calculated should be equal to the reciprocal of the RC product. Compare the inverse to the value of the exponent in your equation by calculating the percent difference. How does this difference compare to the tolerances for the resistor and for the capacitor?
    8. Tap the Run 1 box then tap on "Run 2" to study the discharge. Repeat steps 2-7 above, except use the Capacitor Volts graph for your mathematical analysis.


    DATA

  • Resistance, R


    Capacitance, C


    Charge
    Discharge
    Charge
    Discharge

    Exponent, C


    Product, RC


    Inverse RC, (RC)-1


    % Difference


    MORE ANALYSIS
    1. If we examine the general equation for exponential decay, we could substitute the value Vo/2 for V(t), and solve for the time it takes for the voltage to drop to half its former value.
    1. V(t) = Vo/2 = Vo e-t/RC

      1/2 = e-t/RC

      ln (1/2) = -t/RC

      t1/2 = -RC ln (1/2) = 0.693 RC

      1. Now go to your data for the capacitor voltage during discharge. Pick a value for voltage near the highest one and record the voltage and time in the following table. Then scroll down until you get to a voltage that’s half of that. Record these new values. Repeat, going down in halves.
      Voltage
      Time
      t1/2


      1. Subtract the first time from the second, the second from the third, etc. to yield the half-voltage time. When finished, calculate the average half-voltage time.
      2. What you have just done is to demonstrate that capacitors discharge in a mathematical pattern that is identical to the half-lives that radioactive materials demonstrate. Namely, in equal times, half of the original decays away, then in an additional equal time, half of that decays. And right there on your lab bench!
      3. Compare the average time your capacitor took to drop to half its voltage value with the theoretical 0.693 RC. How does the percentage difference compare to the tolerances of the resistor and capacitor?

      EXTENSIONS

      1. Explore using different capacitor values and different resistor values. What happens to the shape of the graph and the resulting constant if you use a larger value for each.
      2. Put two resistors in series and repeat the experiment. Is the resulting graph the result of a larger or a smaller resistance? Repeat with the two resistors in parallel. What do you conclude about how the resistor values "total" when connected in these two ways?
      3. Put two capacitors in series and repeat the experiment. Is the resulting graph the result of a larger or a smaller capacitance? Repeat with the two capacitors in parallel. What do you conclude about how the capacitance values "total" when connected in these two ways?

      CIRCUIT

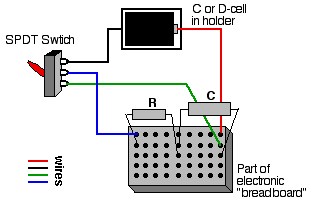
      The following pictorial diagram shows one way that this lab can be carried out easily. The parts can be stored in a small space and can be used in part with other circuit labs. A DPDP switch could be substituted, or even a SPDT knife switch.


    Click here to download this lab in an MS Word format - capacito2-LQ.doc

    Click here to download this lab in a pdf format - capacito2-LQ.pdf

    C. Bakken
    November 2007