|
Electric Charge Lab - Teacher
Notes
|
General
This lab might occupy 2 or 3 days. Don't hurry through
it. Take time for the groups to come to conclusions, even if they
think they know what the conclusions should be.
Faraday's Cage
This lab employs an empty metal can for a Faraday's Cage
charge detector. We are recommending using the small fruit cups
that have the pop-off top. If you are worried about the edge
that's left, a piece of electrical tape or masking tape could be
used to cover it.
Another option would be to cut an aluminum drink can with sharp
scissors to form the U-shaped can. Tape should be used to prevent
cuts.
 A
small sheet metal screw is installed in the side of the cup with
some part sticking out as a place to connect the red test lead
from the Charge Sensor. This also makes good electrical contact
with the can, something that doesn't necessarily follow due to the
thin plastic layer that covers the surfaces of most food or drink
cans.
A
small sheet metal screw is installed in the side of the cup with
some part sticking out as a place to connect the red test lead
from the Charge Sensor. This also makes good electrical contact
with the can, something that doesn't necessarily follow due to the
thin plastic layer that covers the surfaces of most food or drink
cans.
The beaker is used as an insulator to hold the charge detector.
Using a plastic or foam cup introduces a material on which charges
can easily develop. Stray charges can easily throw off any
quantitative results.
We hold the cup to the beaker with double-stick tape such as
carpet tape or simply masking tape that is doubled over. This is
for stability.
Developing Charge
This lab references using wool or other materials to
charge up a plastic ruler. Other materials such as acrylics could
be used. The amount of charge developed may be higher,
necessitating the use of a higher scale on the Charge Sensor.
Success in this lab will depend on the group working
effectively as a group. Through experience, the student who takes
the measurements should not be the one who creates the charges.
The one who takes the measurements will be the grounded student.
This helps to insure that zeroing of the sensor will coincide with
zero charge.
Charge Movers
Charge movers, sometimes called proof planes, are used to
carry charge from one place to another. In an ideal setting, very
good insulators would be used to separate the metal disc from the
handle. In our version, we use an aluminum washer or penny for the
disc. A clean piece of 1/4" dowel approximately 12" long is used
as the handle. Use a wood file to create a flat spot at one end of
the handle on which to mount the washer. Hot glue could be used to
hold the two together or a piece of strong double-stick tape.
Groups need two, one each of the following types.
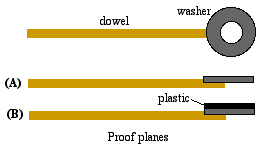
One proof plane (A) should be simply the handle plus washer.
The second (B) should have a piece of material such as
adhesive-backed plastic attached to the washer.
In practice, charge mover A can be used to transfer charge from
a charged object such as a metallic ball. Charging by induction
can be explored nicely with this arrangement.
Charge mover B is used to explore equal and opposite charges.
The student discharges both movers then puts the two into the
charge detector without touching the side. The total charge should
be zero. He then rubs the two movers together, charging one
positive and the other negative. Putting one into the detector
yields a level of charge. Putting the other into the detector
yields approximately the same level of charge but opposite in
sign. Putting the two in, but not having them touch, should yield
zero charge proving the production of equal and opposite charges
during the charging process.
Metallic Ball
This may take some hunting, but there are many hollow
metallic objects that can be purchased at places like drug stores
and discount stores. The shape does not need to be spherical, but
should be relatively smooth. As this is being written, the author
is looking at a spun aluminum apple that would work well for this
investigation.
Thanks to Michele Perrin in St.
Louis for working out much of the step-by-step procedure and
testing it with her students.
The ideas in this lab were
developed from the article "Electrostatics with
Computer-Interfaced Charge Sensors" by Robert Morse in The
Physics Teacher, vol 44, November 2006, pages 498-502. This
short article is an excellent introduction to simple experiments
for charge sensors.
Clarence Bakken
January 2008