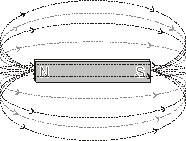
Magnetic field around a bar magnet
|
Magnetism is an inherent quality of a magnet that allows it to interact with other objects with a force of attraction or repulsion. Magnets strongly attract materials made of iron, nickel, or cobalt plus some other rare elements. Such materials are called ferromagnetic as opposed to paramagnetic materials which are weakly attracted to magnets. A third class of materials are called diamagnetic and repel the effects of magnetic fields.
The field lines are more concentrated near the poles of the magnet so the magnetic field is said to be stronger near the poles. The strength of the magnetic field can be measured using a Magnetic Field Sensor. The more magnetic field lines that pass through the white dot on the sensor, the stronger the field. When the field lines pass into the end of the sensor with the white dot, the magnetic field reading is negative. What do you think would happen if the Magnetic Field Sensor were turned around so that the lines went outward from the white dot?OBJECTIVE
In this experiment, you will investigate how the strength of the magnetic field from a bar magnet varies with distance from the magnet.MATERIALS
|
Vernier LabQuest |
unmarked bar magnet or cow magnet |
|
LabQuest App. |
masking tape |
|
Magnetic Field Sensor |
meter stick |
PROCEDURE
1. Plug the Magnetic Field Sensor into Channel 1 of the Vernier computer interface. Set the switch to the 0.2 mT (or LOW)10 amplification setting.2. Tape the Magnetic Field Sensor to the table with the white dot facing sideways. You may wish to bend the probe tip if it works better with your experimental station. Tape the meter stick so it lines up with the tip of the probe and starts from 0.0 at the end of the probe.
3. Prepare LabQuest for data collection by plugging the Magnetic Field Sensor into one of the analog jacks. Start the LabQuest and note that the Magnetic Field Sensor has been detected and a default data collection has been set up for you. Tap the Data Collection square on the right of the sensor screen and make the following settings on the screen that appears using the stylus and keyboard:
Mode: Events with Entry
Number of Columns: 1
Name: Distance
Units: cm
Tap [OK] to finish this step4. Move all magnets far away from the Magnetic Field Sensor. Zero the Magnetic Field Sensor by tapping the red space on the Sensor Screen and choosing ìZeroî from the menu that appears. This cancels out the effect of surrounding magnetic fields on the readings you will be taking.
5. Lay the magnet along the meter stick with one end 40 cm from the sensor. Begin data collection by tapping the Collect icon or pressing the Collect button on the front of LabQuest. Note that a ìKeepî button appears on the screen.
6. When the readings stabilize, tap the Keep button. On the window that appears, enter the distance (40) using the keyboard that also appears. Tap [OK] to complete recording this data point.
7. Now move the magnet towards the sensor in 5-cm increments, repeating step 6 but entering the respective distances. When you have finished 5 cm, you may wish to include 2.5 cm, also.
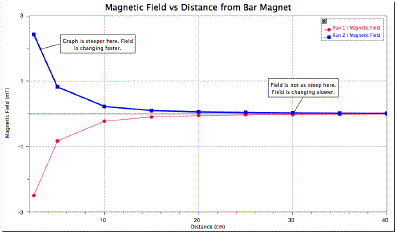
8. Tap the Collect icon (which is now red) or press the Collect button to stop data collection. Examine the graph and characterize what it tells you about how the magnetic field varies as you move away from the end of the magnet.
9. Tap on the File Cabinet icon to the right of the space labeled ìRun 1î. This stores your run and readies LabQuest to take a second run. The space to the left of the file cabinet will now say "Run 2".
10. Place the magnet 40 cm from the sensor with the opposite end pointing towards the sensor. Repeat steps 6-8.
11. How does this second graph compare to the first one? Are there any similarities? Are there any striking differences? Why do you think the biggest difference occurred?
12. To see both graphs together, tap the space labeled "Run 2" and choose "All Data from the menu that appears.
13. Save the data, sketch or print the graph as directed by your teacher.
ANALYSIS
1. As you examine the graphs you obtained, does the strength of the magnetic field change at a constant rate as you move away from the end of a bar magnet? If not, where does it change the fastest, near to the end or far from the end? (Note that this is not asking about how strong the magnetic field is.)2. Are the two graphs symmetric, that is, at a given distance do they have the same values? What does your answer tell you about the poles on your magnet?
3. How would you expect the graphs to change if you replaced your magnet with one that is stronger?
Teacher Notes
NOTE
This lab assumes a fairly weak bar magnet. If yours is strong, the Magnetic Field Sensor may reach its maximum value early in the experiment and not go any higher. Stop data collection and change the switch to the 6.4-mT (High) setting. Go to the Data Table screen and choose "Clear All Data" in the Table menu. Go back to Procedure step 4 to take fresh data. Be sure to zero the Magnetic Field Sensor again with this new sensitivity.This lab was adapted from a lab in Earth Science with Vernier.
SAMPLE DATA
ANSWERS
1. Nearer to the magnet, the rate the magnetic field changes is greater than when one is farther from the magnet. The slope (steepness) of the graph is greater, meaning that for the same change in distance, there is a larger change in the magnetic field strength.2. If your answer is "yes", the strengths of the two poles are nearly the same. Sometimes you will find a magnet that has one pole that is stronger than the other, although this is unlikely with new magnets.
3. The graphs would look very similar, but they would go to higher values at every point. Thus they would curve up faster and go higher.
RESOURCES
Click here to download an MS Word version - magfieldstr.doc
Click here to download a pdf version - magfieldstr.pdfClick here to download an MS Word version for calculators
Click here to download a pdf version for calculators
Clarence Bakken
February 2008