1. Connect the Charge Sensor to
the LabPro. Set the switch to ±2V.
2. Launch Logger Pro.
Delete the table. Alternatively, you can launch LabQuest
App on LabQuest or EasyData on a graphing
calculator.
Note: Most investigations will
involve reading the charge directly off the digital meter. You do
not have to click the Collect button unless the directions ask you
to graph your data.
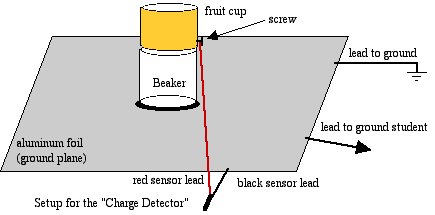
3. Clip the black lead to a large
square of aluminum foil. The aluminum foil is acting as a
grounding plane.
4. Clip the red lead to the screw
on the side of a metallic can. Place the can on top of an inverted
glass beaker using double-stick tape to hold the two together. The
can will act as a "charge detector", while the beaker will
insulate the charge detector from its surroundings.
5. Wrap a piece of aluminum foil
around your dominant wrist. Clip the wrist foil to the foil
square. The wrist foil will ground the experimenter.
6. Before each new investigation,
ground the charge detector by touching it with your finger, then
press the Reset button on the Charge Sensor. If needed, tap or
click the Zero icon on your interface program, too.
1. Hair
a. Touch the aluminum
foil grounding plane. Remove all charge from a plastic ruler by
wiping it with your other hand.
b. Rub your hair with a plastic
ruler for 5 seconds. Then hand the charged ruler to the student
who is in charge of making measurements. He/she will carefully
insert the ruler into the can being careful not to touch the
sides of the can. Record the measurement.
c. Remove all charge from the
ruler.
d. Repeat step (b) for a second
partner. Continue until all members of your group have been
sampled.
e. Record hair color, texture,
and style (long versus short hair) along with charge readings
for all partners.
f. Which type of hair created
more charge? Compare your results with those from other
groups.
2. Clothing
a. Touch the aluminum
foil grounding plane. Remove all charge from a plastic ruler by
wiping it with your other hand. Rub a piece of your clothing
(shirt, fleece, sweater, pants, or socks) with a plastic ruler
for 5 seconds.
b. Then hand the charged ruler
to the student who is in charge of making measurements. He/she
will carefully insert the ruler into the can being careful not
to touch the sides of the can. Record the measurement.
c. Repeat the same steps for a
minimum of 4 samples of different clothing materials.
Record type of clothing, texture,
and fabric along with charge readings.
d. Which type of clothing
created the most charge?
3. Distance
a. Touch the aluminum
foil grounding plane. Remove all charge from a plastic ruler by
wiping it with your other hand.
b. Charge the plastic ruler by
rubbing it for 5-10 seconds against one of the objects from
steps 1 or 2.
c. Hold the ruler near, but not
touching the outside of the can.
d. Click the Collect button to
create a Time graph.
e. Very slowly, and at a
constant speed, move the ruler away from the can for about 5
seconds.
f. Perform an Power curve fit
and record the regression equation. Note: You may need to
repeat steps a-e until you get a good graph.
g. What is the relationship
between distance and time? What is the relationship between
charge and distance?
4. Net Charge
Option A:
 a.
Fold over about 1/2 inch on the ends of 2 pieces of magic
transparent tape to form non-sticky handles for you to
grasp.
a.
Fold over about 1/2 inch on the ends of 2 pieces of magic
transparent tape to form non-sticky handles for you to
grasp.
b. Stick one piece of tape to
the lab table.
c. Place the other piece of
tape on top of the first (sticky side down).
d. Pull the tape combination
off the table (the two pieces should still be stuck together).
While grounding yourself by touching the aluminum foil ground
plane, rub your finger back and forth along both sides of the
tape to remove any charges.
e. Grasp the 2 handles and
separate the 2 pieces of tape.
f. Bring them near each other,
but don’t allow them to touch. What do you observe?
g. Drop one piece of tape into
the charge detector. Record the charge.
h. Drop the 2nd
piece of tape into the charge detector. Record the
charge.
i. What do you conclude about
the net charge you generated by pulling the two pieces of tapa
apart?
Option B:
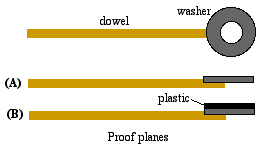
a. Obtain one each of the two
types of charge movers, one plain and the second with a piece
of plastic applied to it. While grounding yourself by touching
the aluminum foil ground plane, touch the two proof planes with
your fingers to remove any residual charges.
b. Test for the absence of
charges by moving each of the charge movers into the charge
detector and assuring yourself the readings remain zero.
c. Rub the two charge movers
together for 5-10 seconds. Separate them and move each, one at
a time, into the charge detector. Record your readings.
d. Now move both of the charge
movers into the charge detector, keeping them from touching.
What is the reading now?
e. What do you conclude about
the two charges on the charge movers and the overall net
charge?
5. Induction
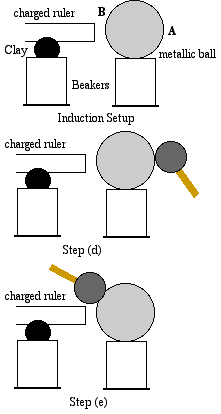 a.
Obtain a metallic ball and place it on an upturned beaker using
double-stick tape. Set this on your ground plane away from the
charge detector. Touch the ground plane with one hand and the
metallic ball with your other hand, removing any charges that
may have developed.
a.
Obtain a metallic ball and place it on an upturned beaker using
double-stick tape. Set this on your ground plane away from the
charge detector. Touch the ground plane with one hand and the
metallic ball with your other hand, removing any charges that
may have developed.
b. Rub the ruler for 5-10
seconds with a material you previously determined generates a
good charge. (Alternatively, a piece of acrylic rubbed with
wool will generate a nice charge.)
c. Move the ruler into your
charge detector and note the relative size and sign of the
charge on it. Be careful not to touch the charge
detector.
d. Set the ruler on a second
beaker to hold it, then move it until it is close to the
metallic ball, but not touching it. Discharge a charge mover.
Touch the charge mover to the metallic ball at the position
labeled "A" in the diagram, a point opposite the ruler. Then
move the proof plane into the charge detector. What is the sign
of the charge you picked up? How does this compare to the
charge on the ruler?
e. Take the charge mover back
to the ball. Touch the ball at point "A", then slide it along
the ball to a point close to the ruler, "B", being careful not
to touch the ruler. Remove the charge mover and test the charge
you picked up.
f. Return the charge mover to
the ball, but move it to several places along the space between
"A and "B". Note the sign and size of the charge you picked up
at each position. Is there a place you can touch the metallic
ball and end up with zero charge on the charge mover?
g. Explain the observations you
made during the steps above.
6. Charging by
Induction
 a.
Obtain a metallic ball and place it on an upturned beaker using
double-stick tape. Set on your ground plane away from the
charge detector. Touch the ground plane with one hand and the
metallic ball with your other hand, removing any charges that
may have developed.
a.
Obtain a metallic ball and place it on an upturned beaker using
double-stick tape. Set on your ground plane away from the
charge detector. Touch the ground plane with one hand and the
metallic ball with your other hand, removing any charges that
may have developed.
b. Rub the ruler for 5-10
seconds with a material you previously determined generates a
good charge.
c. Move the ruler into your
charge detector and note the relative size and sign of the
charge on it. Be careful not to touch the charge
detector.
d. Set the ruler on a second
beaker to hold it, then move it until it is close to the
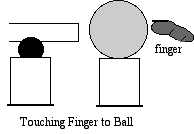
metallic ball, but not touching it. Touch the ball on the
opposite side as shown in the diagram. Take your hand away then
remove the ruler.
e. Discharge a charge mover.
Touch the charge mover to the metallic ball, then test to see
if any charge is on the ball, and if so, how it compares with
the charge on the ruler.
f. Conductors like metals allow
charges (electrons) to flow easily from place to place under
the influence of electrostatic forces. Try to explain what you
just did making diagrams for the various steps - before the
ruler, with the rule, with the hand, after the hand, after
removing the ruler.
g. Develop a technique that
uses induction but charges the ball the same as the charge on
the ruler.